Roof Ladder Build
A Must Have accessory
One of the accessories that has been sorely missing since we took possession of the “finished” truck was that of a roof ladder. Although we could gain access to the roof via the skylight hatch located over the bed at the back of the truck, we had to stand on the bed to get through it. If the weather was inclement, and the roof wet, this meant climbing onto the wet roof in stocking feet, or trampling over the bed linens with wet dirty shoes on. Worse that this, if it had snowed, and we wanted to clear the solar panels so they’d work, opening a snow laden roof hatch over a bed would have obvious downsides.
Sure we have been carrying a telescoping ladder, but this was stored under the slide out tray in the storage bay, and was not always convenient to access. It also weighed a lot, and was much longer than what we needed. It was purchased for the motorhome we once owned which had a much higher roof.
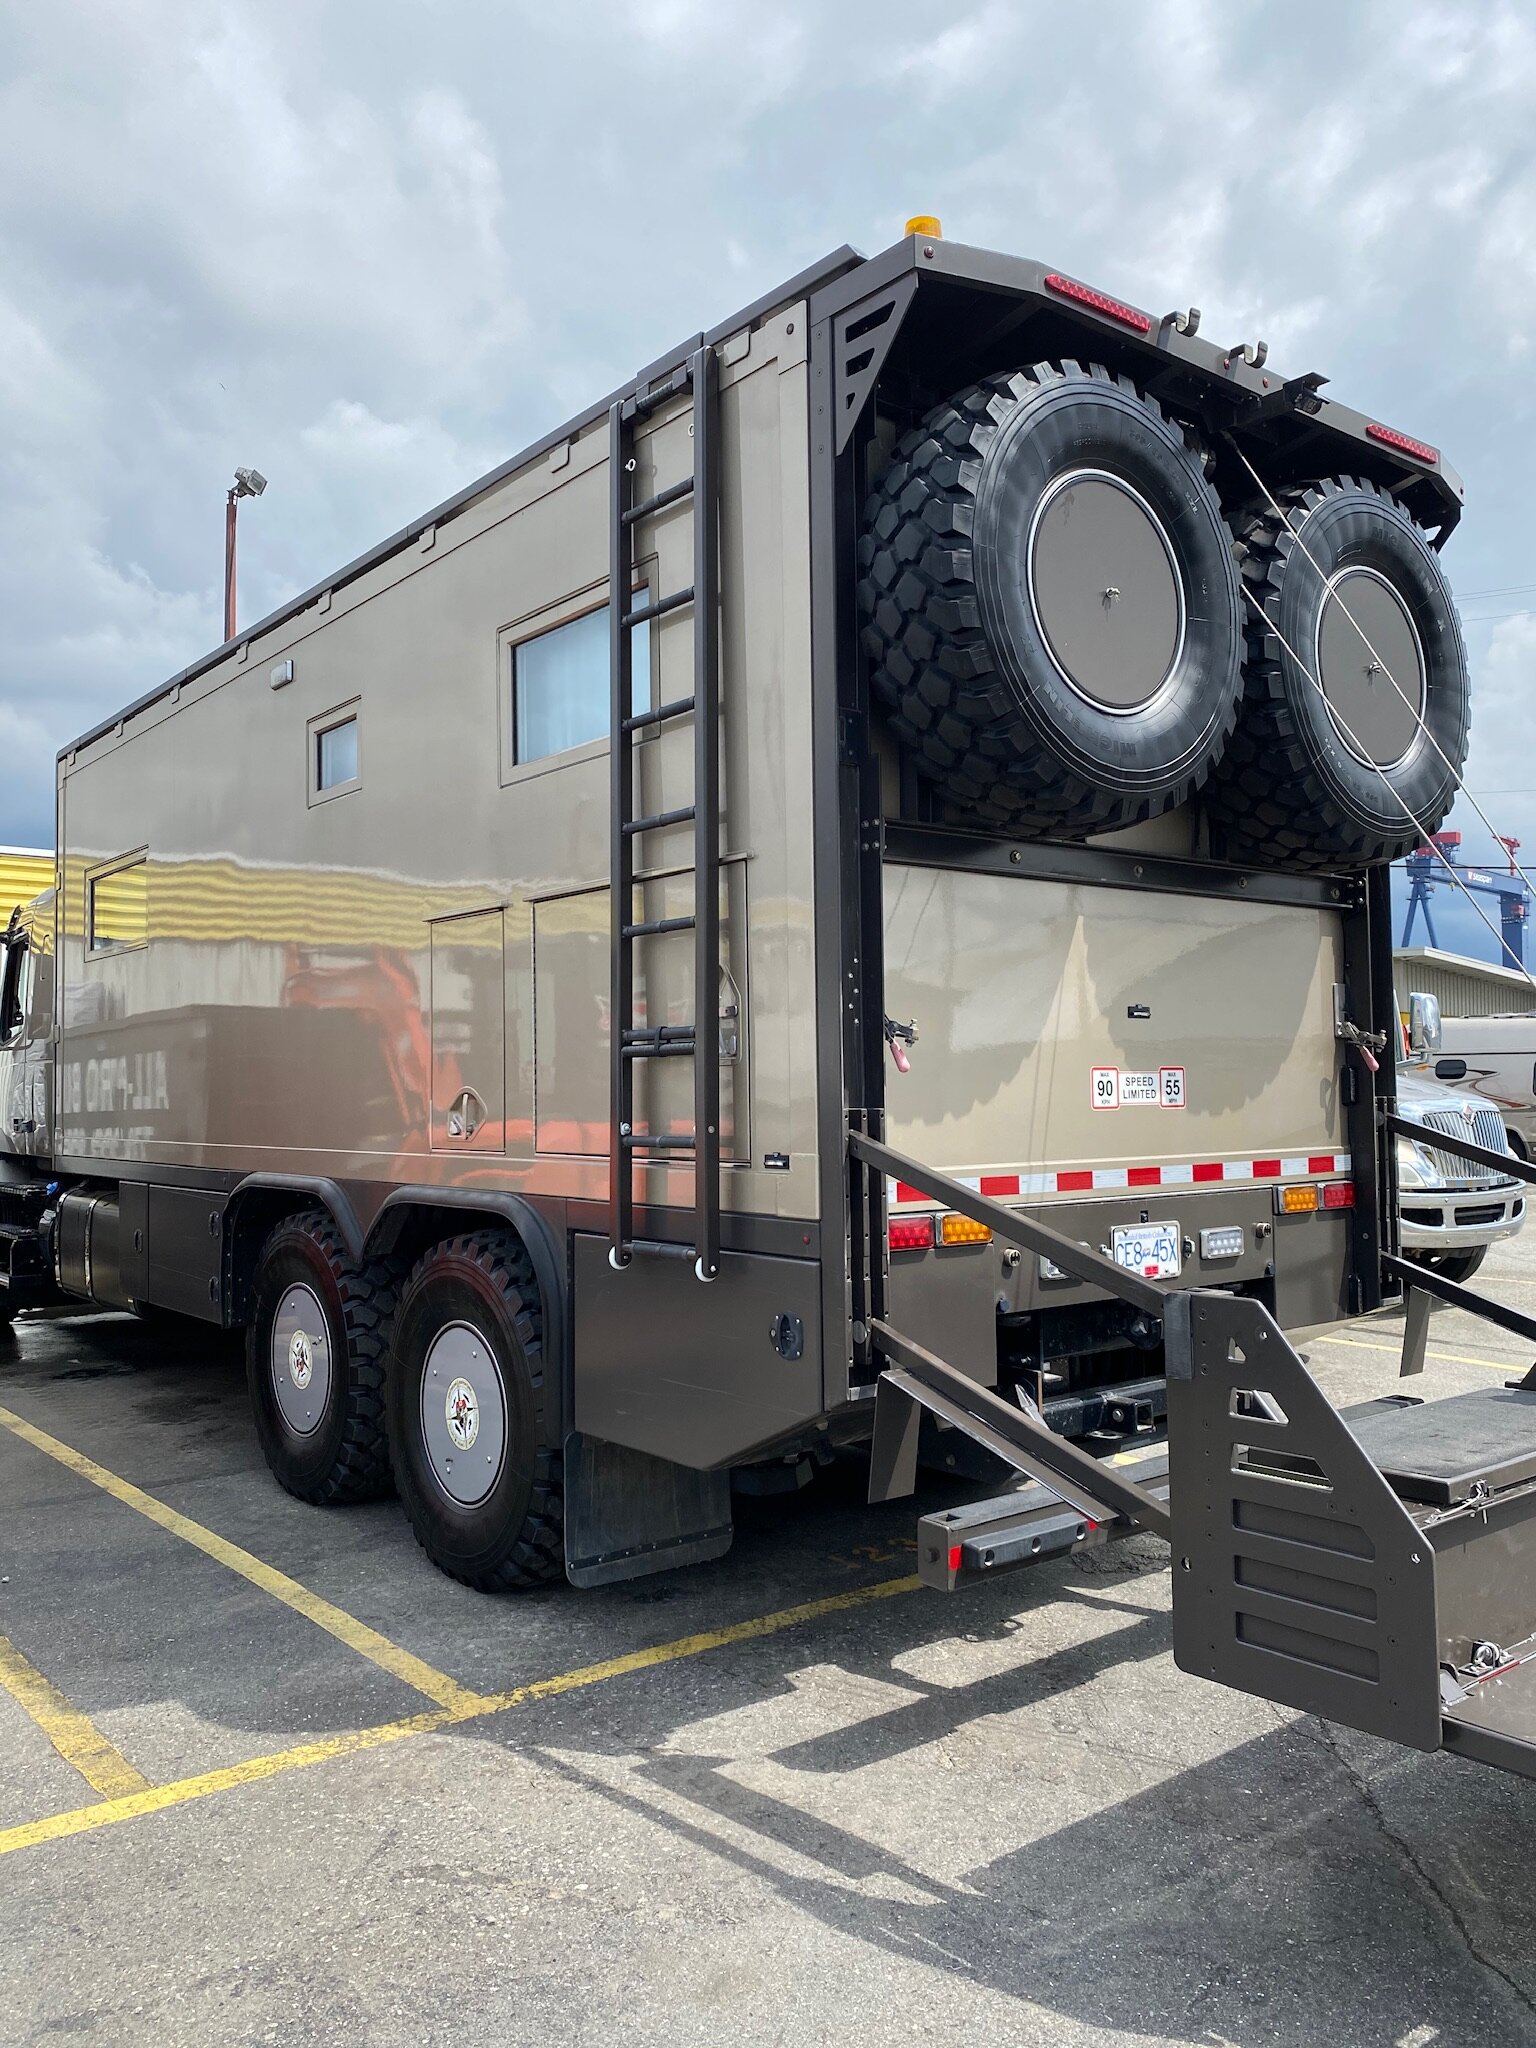
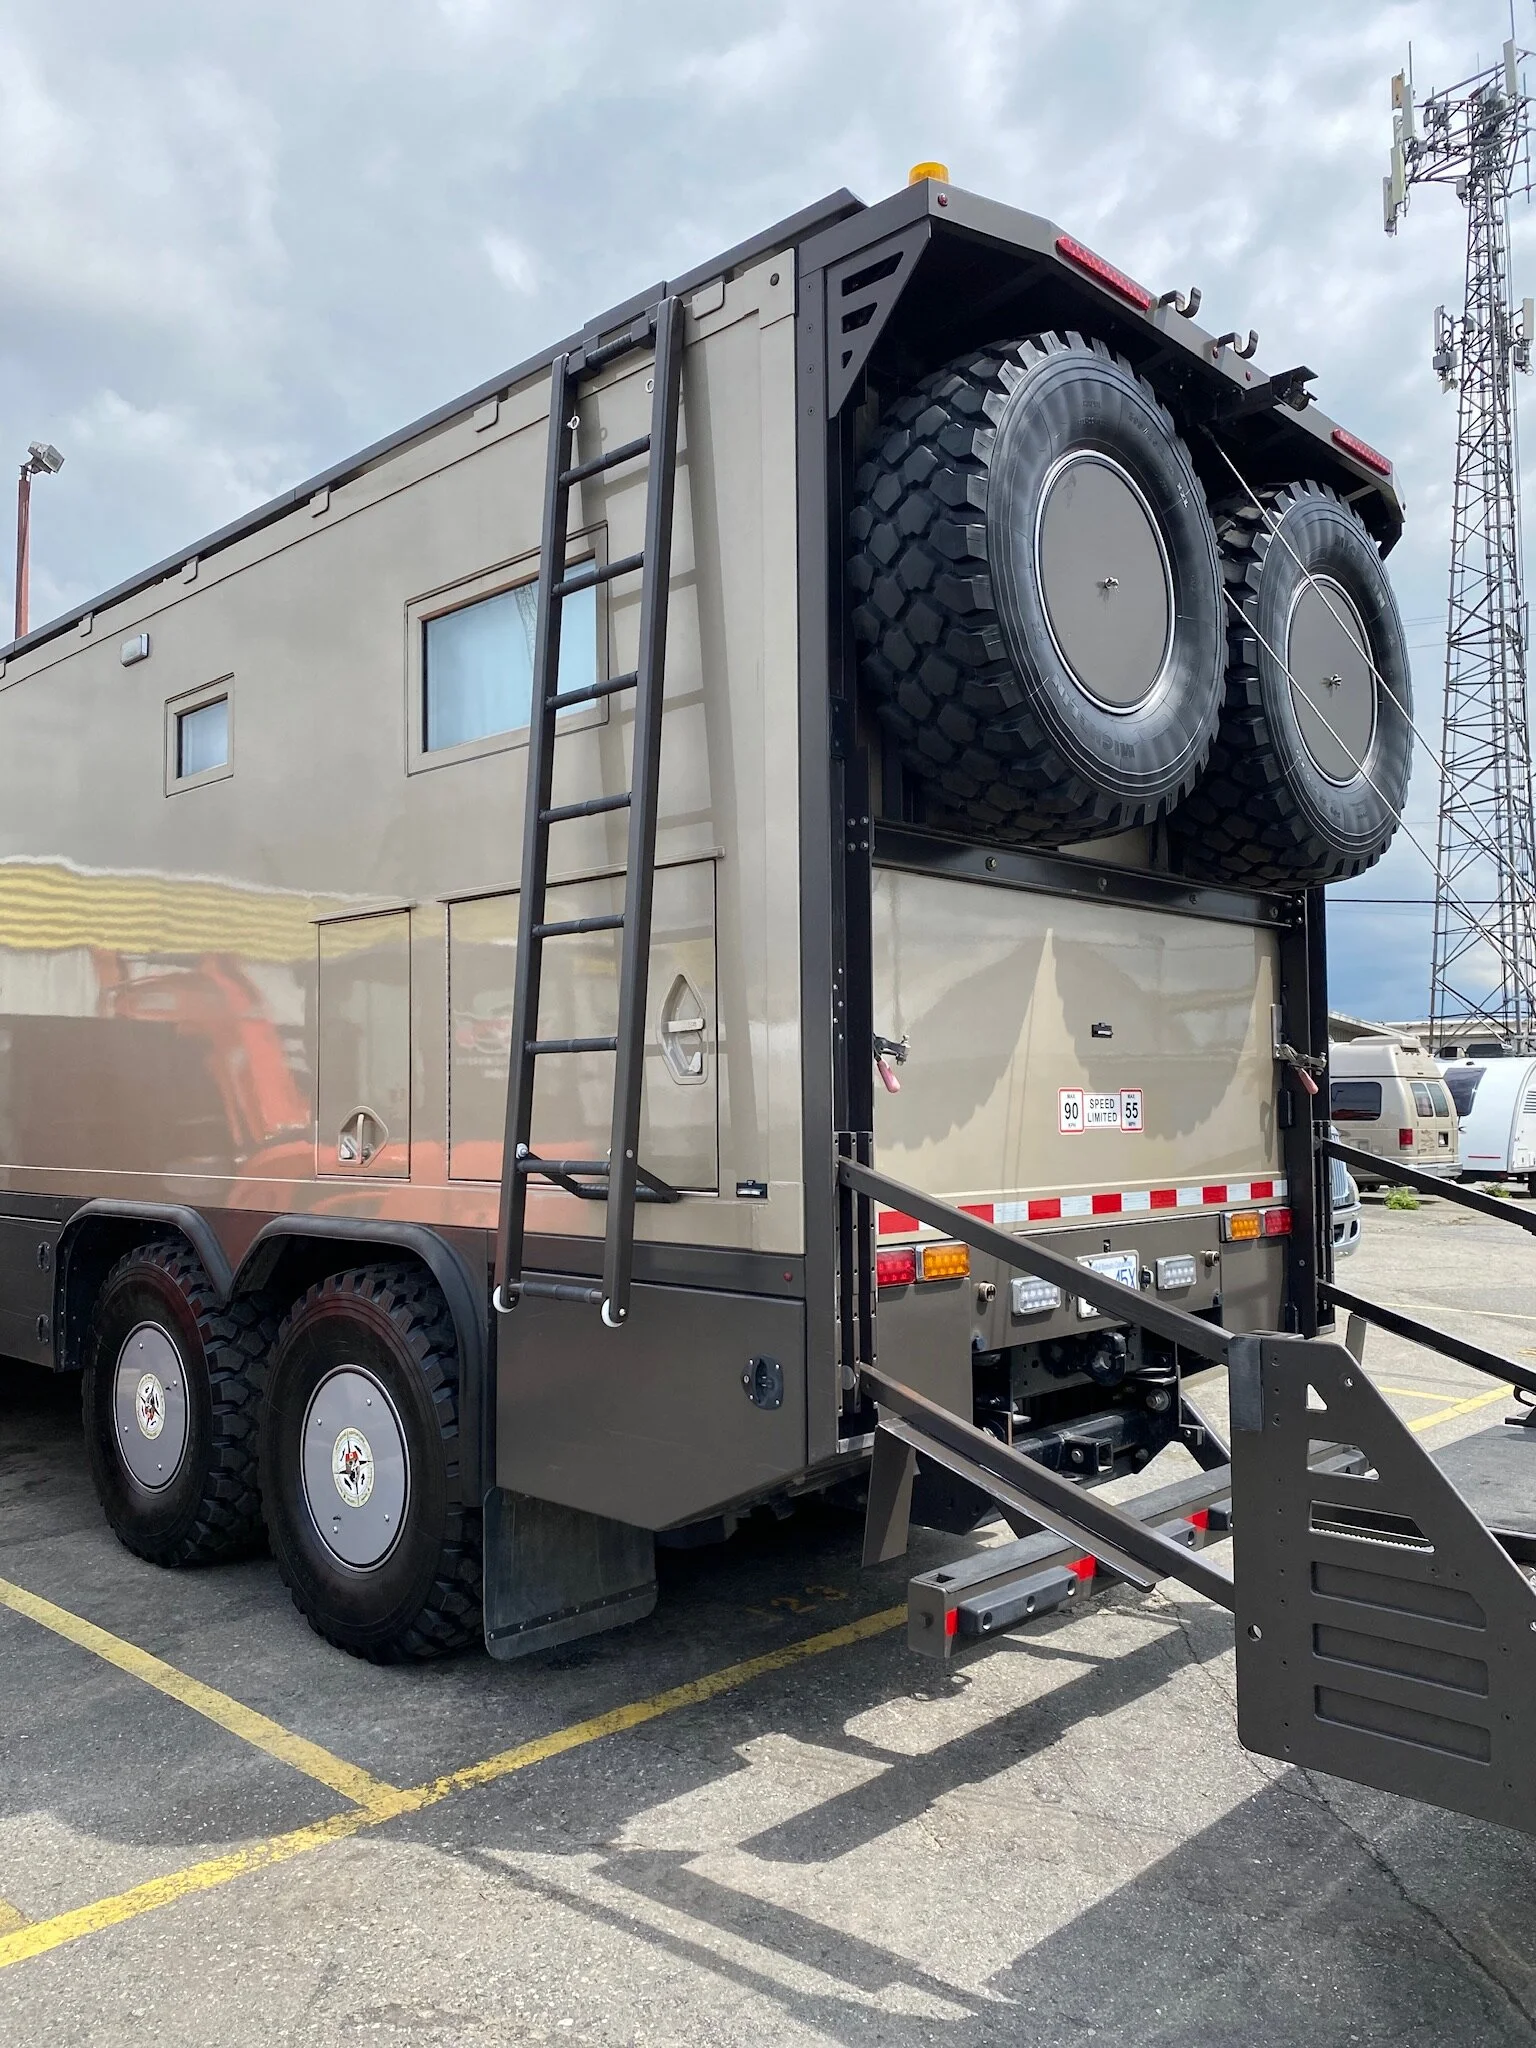
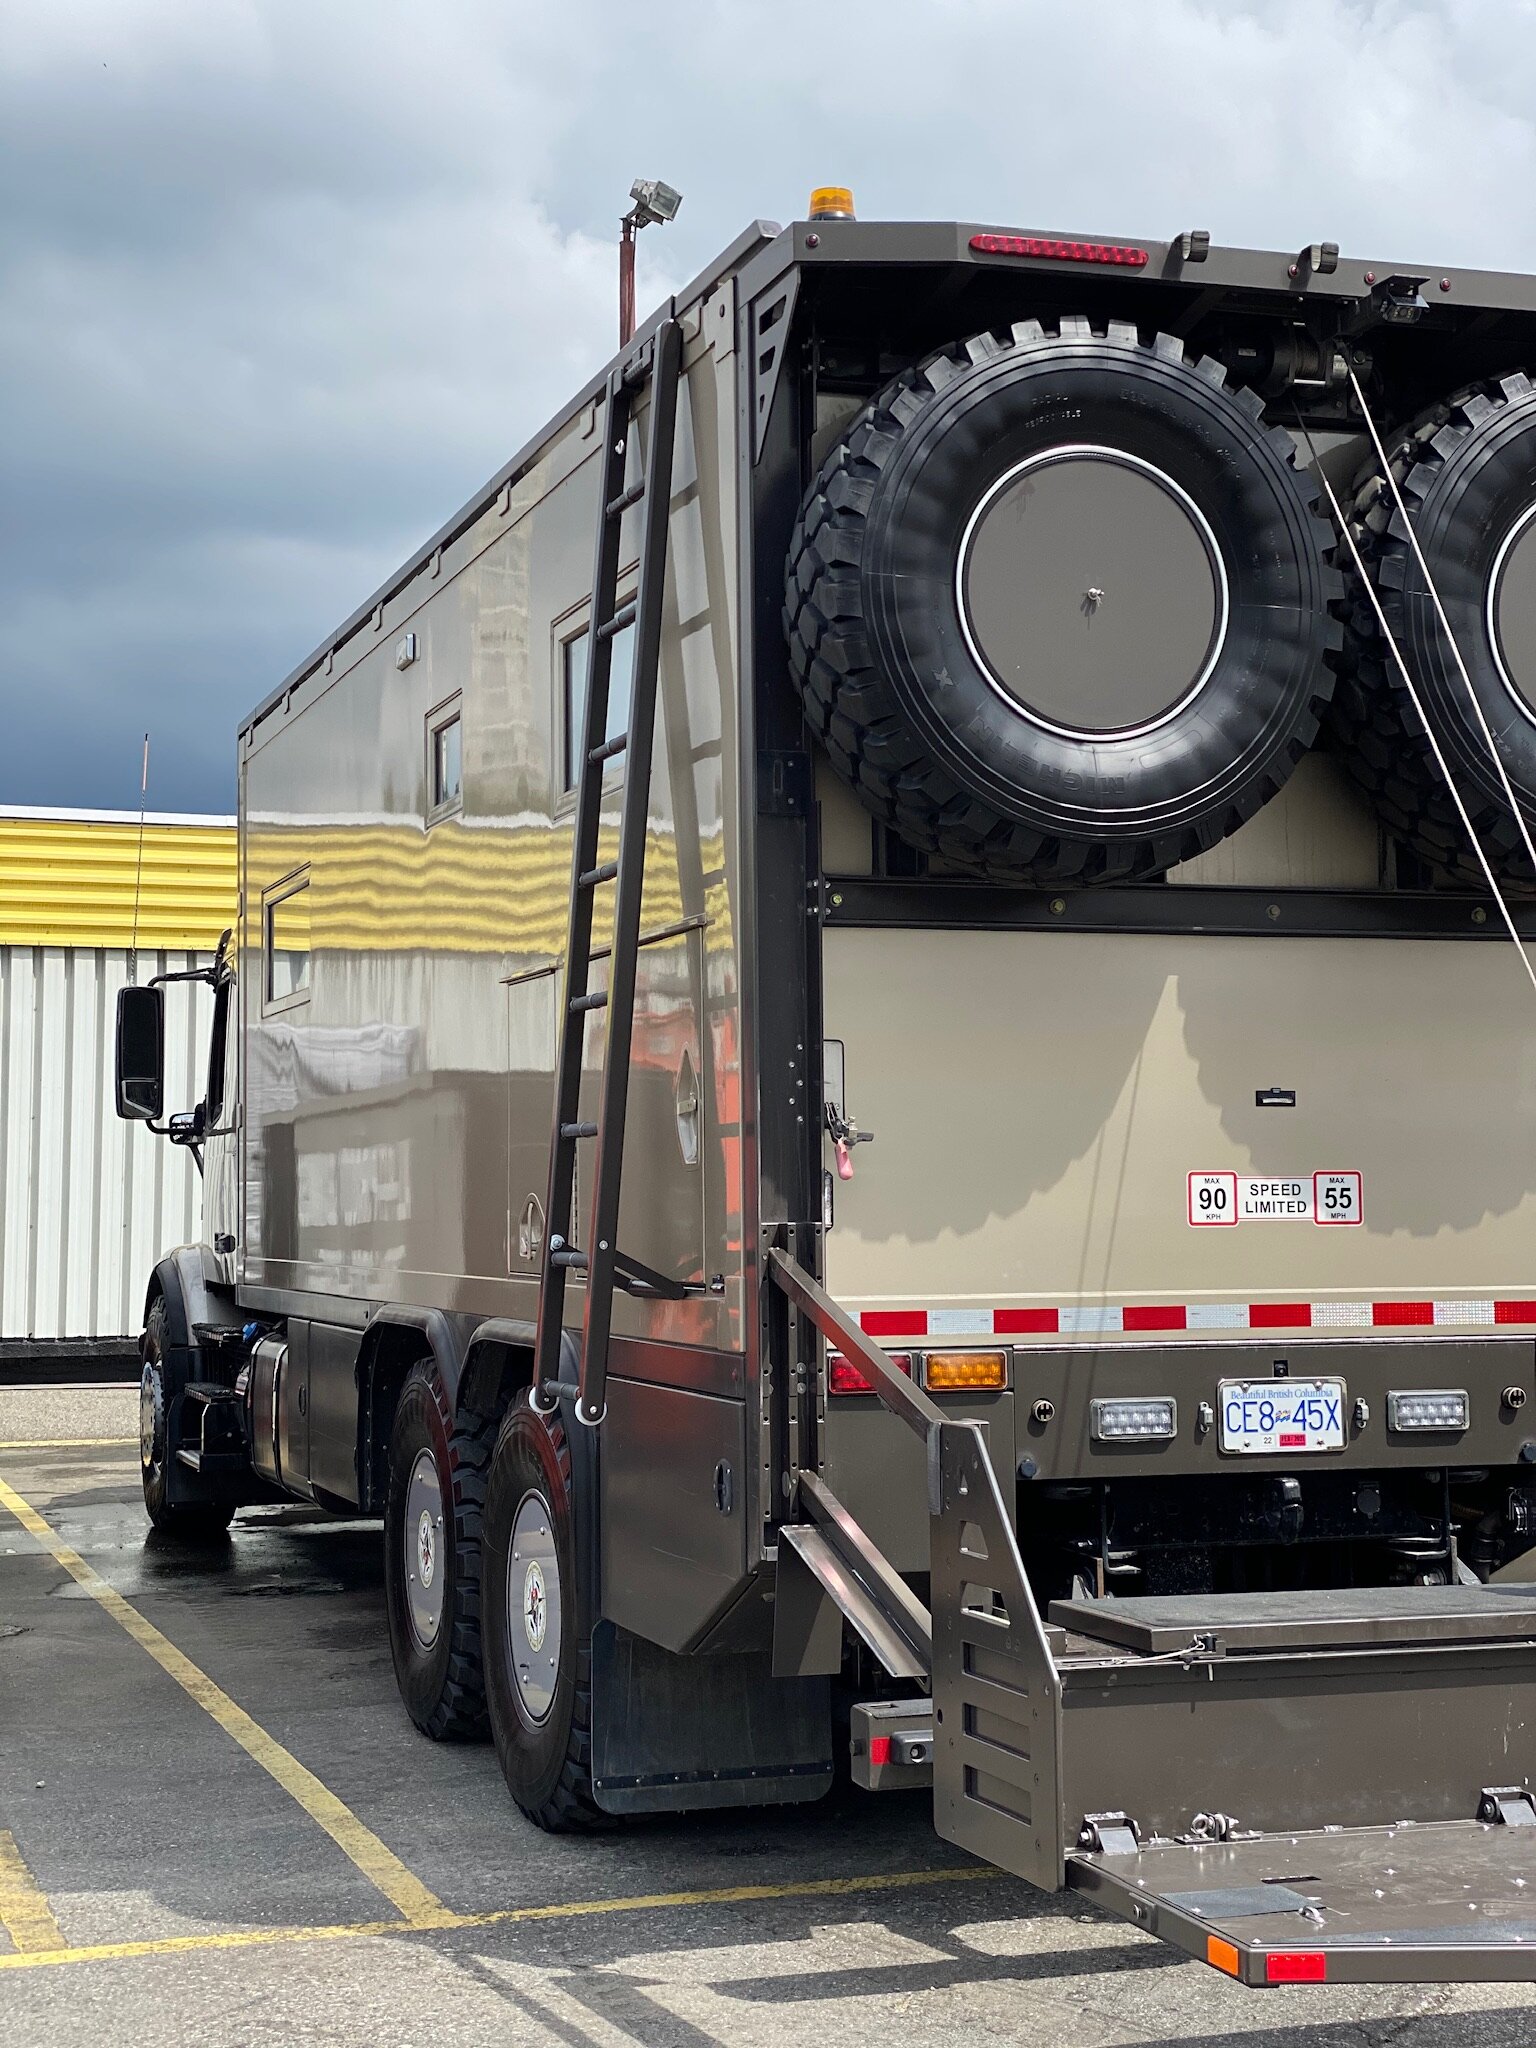
We wanted a shorter solution that was accessible from outside the truck, and that could be stored on the roof itself in case we needed to make an emergency exit from the camper through the roof hatch and wanted a safe way to get down off the roof. It’s twelve feet down onto the ground, and although we have a lift platform on the back of the truck that divides this distance in half, it would still be unsafe to try and jump down onto the lift and then down onto the ground, especially if the bike was on the lift at the time.
Made from 2” square aluminum tubing, with 1-1/4” diameter rungs, the ladder dimensions were calculated so it could perform as a ladder and a ramp.
By storing the ladder on the roof, not only would it meet all our needs, it would also not be visible from the ground, or accessible by unauthorized people who might want to use it to gain access to the truck through the roof. A popular method of ingress for thieves.
More than Just a Roof Escape Ladder
Along with the ladder being an escape ladder, I designed it so it could also be used for other purposes. It could also be hung down the side of the truck by means of a special bracket which was designed to attach to the roof rails. Any maintenance needing to be done on windows or outside lighting could be done from the side hanging ladder.
The ladder will also be useful for accessing the roof of the truck cab when a roof rack is eventually manufactured. Again, the ladder would be available for our use, but not available for someone trying to get at whatever might be stored on the truck cab roof rack.
The working drawing for the ladder showing the various lift positions when using the ladder on the roof, and also the ramp slope and positioning of the tire on it.
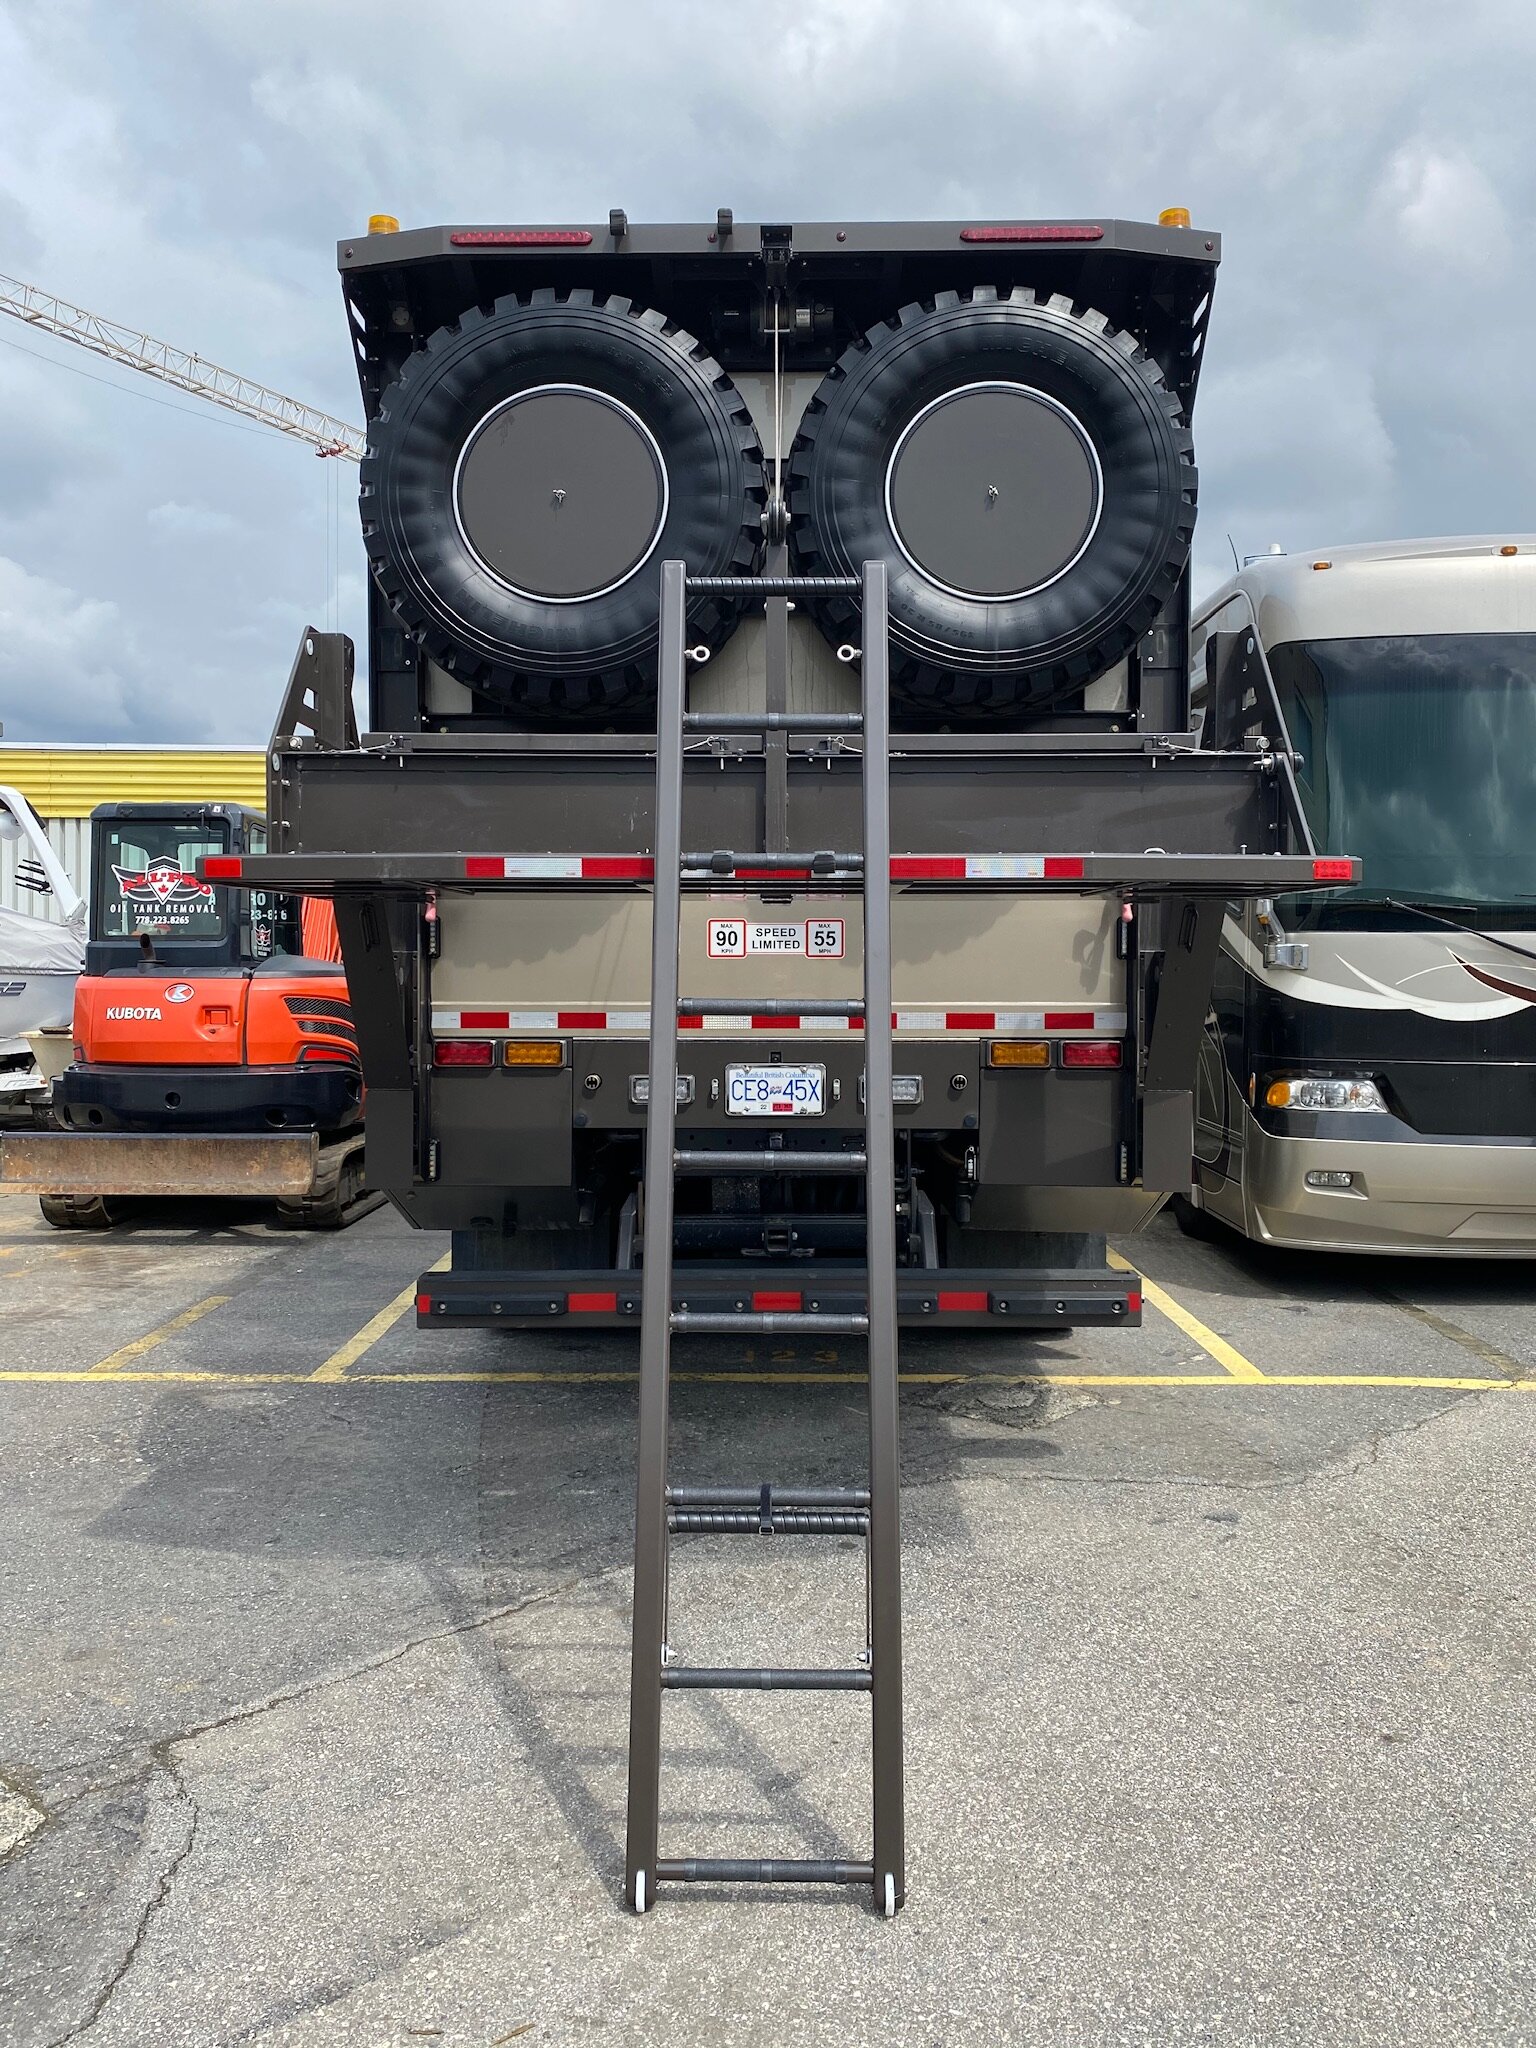
One final use for the ladder, and one that is essential, is for it to act as a ramp when removing and replacing the spare tires on the rear of the truck. The wheel/tire combination weighs 148kg. (325 pounds), and when it is lowered down on the rear lift it still sits 46cm (18in.) above the ground on the lift storage box. Although gravity helps getting it down off this plinth, it acts against us getting it back up. It really takes two people to try and boost it back up onto the plinth. That’s still a bit of a grunt, and in fact caused me a small back injury when performing the task on one of our trips. When I made the roof ladder, I did so with this in mind, and made the length of the ladder, and spacing of the rungs, so that the heavy wheel/tire assembly could be easily rolled up the incline and into position. The spacing of the rungs is such that it lets the tire drop an inch or so into the void between the rungs. So if a rest is needed, the tire will sit happily on its own at any point along the ramp.
Build Sequence
The material chosen for the main rails of the ladder was 2” x 2” x 3/16” wall aluminum tubing. If we were just making a ladder, we could have gotten away with 1/8” wall tube, but because of the ramp aspect where it has to support 325 pounds over an eight foot span, we opted for the heavier material. The difference in weight is 8 pounds overall.
For a structural build, the 1-1/4” diameter tubing passes through precision holes machined into the face of the vertical members. The ends of the vertical members were also fitted with radiused caps of 1/4” thick material so the ladder ends can take abuse, as well as support eye hooks that will engage the lift when the ladder is used as a ramp.
After the end caps were TIG welded in place, the weld beads were dressed down using a disk grinder and hand file.
Once all four faces of the square tubing were dressed down, the next stage of corner radiusing of the square tube end was done.
The corner radiusing of the square tube ends was performed with a conventional woodworking hand router. A 3/8” radius carbide bit was used to match the radius on the corners of the square tubing.
Once the edges were machined with the router, the machining marks were sanded off using a 220 grit sanding cloth.
The ladder was welded together by a top and bottom weld on each end of the rung material. Because of the tight fit through the holes in the vertical tubing, a full circumference weld was unnecessary. This made it possible to eliminate any distortion to the vertical member from the welding heat.
A perfectly straight ladder was attained, and the end caps were drilled and tapped to receive the eye hooks that will engage with the spare tire cradle.
To ensure that the ladder is secure when using it to get off the roof, a set of stainless steel brackets were fabricated and then bolted to the metal roof of the spare tire storage assembly. The ends were wrapped in a special rubber tape so the stainless steel brackets don’t damage the powder coating on the ladder rungs.
The white tape material shown here is simply holding the final wrap of the rubber tape while it finishes its vulcanizing process to itself.
In order to store the ladder securely on the roof of the truck, a specially shaped bracket was machined out of plastic. The base plate was made from 1/4” Delrin plate, and the white “hooks” were made from high density polyethylene. The polyethylene is a softer, more slippery plastic, and less likely to damage the powder coating on the ladder rung.
The other end of the ladder is held by two Quick Fists, and can be done up or undone while standing on the rear lift at the back of the truck.
The left hand bracket is a standoff bracket to be used when the ladder is suspended down the side of the camper box.
The right hand bracket engages with the roof rails so the ladder can hang from it when using the ladder on the side of the camper.
Here are the main parts of the ladder and mounts, ready to be lifted up and installed on the roof.
The forward attachment bracket we first fastened to the roof using double sided tape underneath of the base plate. Then the assembly was sealed to the roof using a special high strength roofing tape made by Eternabond. Once installed, this tape is near impossible to remove.
The ladder sits nicely alongside the roof rail, and behind the solar panel. The ladder rail is slightly below the top level of the roof rail, and well hidden from view from the ground.
When the ladder is installed in the front bracket, and held by the rear Quick Fists, it is rattle free and very secure.
When the ladder rung is sitting into the roof brackets, and the bottom sitting on the lift, it is very secure and easy to use.
Once back from sandblasting and powder coating, the remaining parts and anti-slip tape were installed.
Wheels were made so that the ladder could easily be rolled along the roof from the rear lift when securing it for storage. The plastic wheels also keep the powder coated metal from touching the ground. The ladder won’t slide out because the upper rung is always held securely within the roof brackets.
Anti-slip 3M tape was installed on each rung for added safety.
The swing out stand off is stored in place using a simple velcro cable strap.
The cross member of the standoff is wrapped with a plastic hose wrap material and will prevent the standoff from damaging the painted wall panels on the side of the camper.
The end rung was also coated with the wrap material so it will tightly engage the bracket that hangs from the roof rails when used on the side of the truck.
The eye hooks that engage with the spare tire lifting cradle are stored right on the ladder so they are always available for use.
The inside of the roof rail bracket was lined with velcro loop material to make it tight, and to prevent it from marking the powder coating on the roof rails.
The final touch on the ladder was to attach a heavy anti-slip rubber tape to the ends of the two runners. This way the paint won’t be damaged if this end of the ladder is sat on the ground.