

Roof Rack build


1997 NAS D90 LE With Specialty Devices Rack
Interestingly enough, we actually owned one of these Limited Edition D90s for a while. But realizing that we weren't really part of the "car collecting fraternity", we decided to part with it.
As you can imagine, putting a full roof rack on a soft top Defender is a bit of a challenge. Mind you, putting one on any Defender is a challenge since even the hardtop models don't have enough strength in the roof structure to support any load. But Land Rover did have a factory roof rack for this model that was made by Specialty Devices in the U.K. Unfortunately, because they were hellishly expensive, not many people ordered one for their Defender when they bought it new. Some models, like the '97 Limited Edition D90 came with it stock. But there were only 300 of those manufactured, and exported to North America.
Trying to find one of those factory roof racks nowadays is pretty darn hard. I can't imagine the price someone would be asking if they actually had one. There was someone that was making knockoffs in the U.S. for a while, but I don't think there was enough of a market for them, and they disappeared.
Fortunately for us, recreating a roof rack that looked very similar to the original one from Specialty Devices wasn't that difficult. We had already bought our little hand bender for the nerf bar build, so it was just a matter of thinking about all the various ways we might want to use our rack, and then designing as many of these eventualities into it as we could.
What made the design process a bit more involved was the fact that if we wanted to use the vehicle just as a coffee bar "show off", and wanted to have a short bimini top on it, we might not want the back section of the roof rack on. So we needed a way of separating the front half from the back. And so it began…
You can look at the photos below individually with the descriptions, or open a "picture only" slideshow here.
Roof Rack Build sequence
This Specialty Devices roof rack is the look we wanted to emulate. The rear supports shown here are mounted directly to the thin aluminum body panels. Our design, however, will mount to the bumper instead.
Like the other projects, we started by bending some tubing.
We made use of the Equipe 4x4 corner bumperettes that we put on the truck in the early days, and machined a bolting plate that was welded to the bumperette.
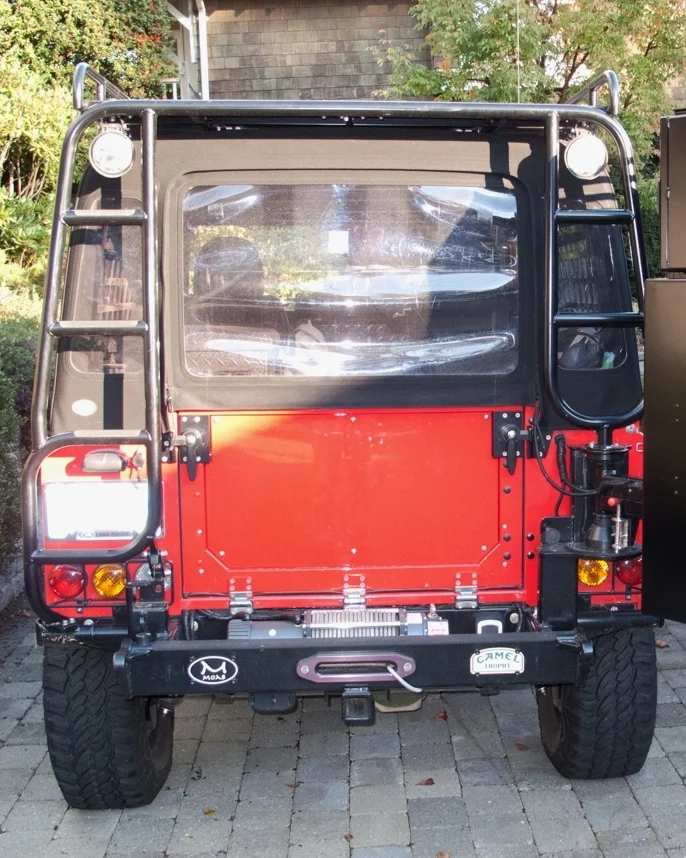
The start of the rear rack support. We arranged the geometry so that it didn't obscure the license plate or lights.
Both sides of the rear support bent and tacked in place with the welder.
We had to ensure that the rear support cleared the rear swing gate, and all that it carried.
The passenger side hoop had to be made in two pieces and joined at the bottom because the space between the two bends was too close together for the bending machine to grip the tubing and make the second bend.
This kind of work is very time consuming because all the joints have to be shaped for a perfect fit on the round tubing. It's necessary in order to get clean, attractive welds.
Once the basic construction of the front rack section was tacked together, it had to be put in place and checked with a long straight edge to make sure it's vertical height was right so it would line up with the rear support.
Nothing looks worse than a roof rack that is not parallel with the lines of the vehicle.
The objective with the front rack section was that it would be just tall enough to cover overtop of the driving lights. We didn't want the rack unnecessarily tall, as it would restrict places the vehicle could access.
The assembly of the front rack section had to be done on top of the vehicle. The location of the vertical posts was fixed by the position of the aluminum clamping blocks. Those blocks had specific places on the roll bar where they had to go.
Once the posts were in position, and trimmed to the correct height, the 1" horizontal tubes could then be cut, coped and bent. Tacking all the pieces together had to be done in situ, so we had to cover the roof, bonnet and wind-screen with heavy cardboard. We didn't want splatter from the welding to burn holes in our brand new Badger soft top.
After the front section was tacked together, we could then measure for the rear section of the rack.
Then an additional set of tube hoops were bent and fitted so they cantilevered out overtop of the driving lights. Additional posts were dropped down onto the points pre-designed into the light bar base.
The complete front section, all tacked together while on the roof, was now removed from the vehicle for final welding.
Here is a good example of why anyone who welds needs to always wear the appropriate respirator when doing the work. Even with the garage door wide open, there was sufficient smoke created to fill the room with the toxic gases.
After the assembly was welded, brackets were attached in order to install LED work lights.
High quality LED work lights were positioned on each side of the front rack section, as well as on the back of the rear rack section.
After getting the rack parts back from powder coating, double sided tape had to be applied in preparation for attaching the aluminum checker plate deck plates.
Powder coated, custom fitted aluminum plates were held in place with the two sided 3M tape.
After the panels were in place, pop-rivets were installed to ensure the panels couldn't detach. The main advantage of the two sided tape was to eliminate rattling.
To finish off the job properly, all of the pop-rivet heads were painted to match the panels.
Each rivet was coated.
The rear rack support had cross braces welded into it, and those braces acted nicely as ladder rungs. So to prevent slipping, and also protect the paint finish, we applied 3M anti slip tape.
Each rung was done on both sides of the vehicle.
Here you can see the heavy padlock holding the swing gate securely closed. A piece of double sided Velcro is wrapped around the lock body to cover the key hole, and protect it from dirt infiltration.
Ten years later, that silly piece of Velcro is still doing the job nicely.
Because of the way it was designed, the entire rack can be removed by simply unbolting the screws shown here...
...as well as these three bolts here. Then it's just the screws that hold the front rack section to the roll bar aluminum clamp blocks.
Behind the rack mounting base plate, there are four stainless steel 3/8" NC countersunk machine screws that secure the upper swing gate bushing. Removing these allows us to lift off the top plate, and then lift the swing gate up and out of the lower bushing. Everything comes apart easily.
The rear rack support assembly works well with the rear swing gate. You can see here how everything fits nicely together.
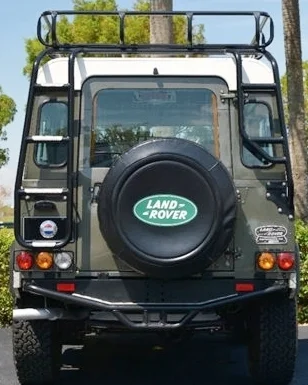
If you compare the look of our rear rack support with that of the Specialty Devices rack from the U.K., it looks very similar. We just don't have the top basket cross rail and vertical posts like the U.K. version.
The back rack support has two of these high power LED work lights installed.
The wiring for the work lights actually feeds up from the bottom of the rack support, inside the 1-1/2" tubing and pops out right at the light mounting bracket.
We included attachment points on the front rack section so our branch deflector cables could be bolted in place. Again, these cables were all made from stainless steel sailboat rigging parts.
The front hoop of the roof rack protrudes about 1-1/2" out in front of the driving lights so they are protected from overhead branches etc.
The side work lights also had their own protection cage surrounding them.
This is the connection point where the front and rear rack sections bolt together. The extra set of holes is so the rear rack section could be made wider in case we wanted to add a roof top tent later on.
The rear rack side rails were finished off with a soft curve down to the deck. We didn't close the back of the rack off with a rail like the Specialty Devices roof basket. This gives us the ability to carry things that might need to stick out the back a little farther.
The completed roof rack from above.
Because our Defender is a convertible, one of the things we anticipated when designing the rack, was that we might want to stand up in the rear cargo area and look out from above. This is a very useful thing to have for photographers… which would be us.
If you look closely, you can see the four locking screws in the corners of the lift out section.
We were able to buy these Land Rover original Defender decals, so we got three of them. One for each side like shown here, and the third for the front of the bull bar.
It's a nice touch that helps to make the build look more like a factory installation.
The completely finished roof rack assembly carrying a second spare tire on the roof. It all works really well, and we feel it enhances the look of the Defender.